MP3 & WMA: The Best of Both Worlds
June 12th, 2006 Jason Dunn
The choice of MP3 or WMA depends on what you want to do with the files – modern software for video and audio editing can deal with WMA as easily as MP3, so the real question is what your audio player can handle. All Windows Mobile players obviously support WMA – in fact, basically every audio player on the planet supports WMA, except the most popular one of all: the iPod (what’s really interesting is that the chipset does support WMA, but Apple disables it). If you want to have the flexibility to get an iPod in the future, rip to MP3. If you could care less, WMA is fine. And WMA will also save you space – you can generally go down one or two notches in bit rate with WMA and have it sound just as good. So if you decided that a 192kbps MP3 sounded perfect, a 160kbps or 128kbps WMA will likely sound nearly identical – but with smaller file size.
But what if I were to tell you that having the best of both worlds was possible? Windows Media Player 10 has a really cool feature that many people don’t know about – it’s called per-device transcoding. The word “transcoding” simply means to take something in one format and re-encode it in another format. So taking an MP3 and turning it into a WMA is transcoding. Where this becomes useful is when you want to rip your CDs in one format, but listen to them on your Windows Mobile device in another format.
So, for example, let’s say that you decide you want to rip your CDs in MP3 format for maximum flexibility, and at 320 kbps because you want insanely high quality. Done and done – Windows Media Player will do that for you. But here’s the cool part – you can tell it to automatically convert those big MP3 files to much smaller low-bit rate WMA files to save space. This is especially important if you don’t have much storage space on your audio player – it can make the difference between getting 30 songs on your player, or getting 180 songs on there. As an example, my wife uses a Dell Ditty, a small and very basic audio player with 512 MB of storage space. She uses it at the gym, so audio quality isn’t that important. When I performed the procedure below, the number of songs she was able to keep on the Ditty went up by 500%. She has much more musical variety, and hasn’t complained about the sound quality. ![]()
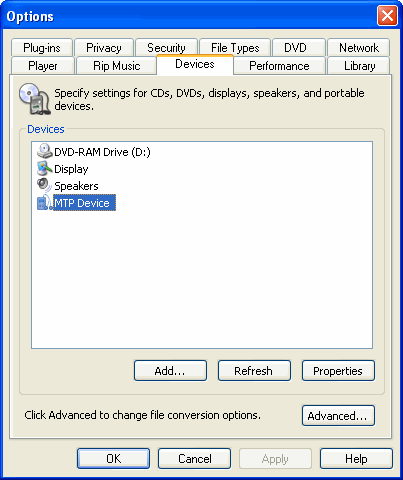
Here’s how you do it: connect your Windows Mobile device (or compatible device, then open Windows Media Player, and navigate to TOOLS > OPTIONS > DEVICES. You should see a list of several devices on your computer, including the one you just connected (it may show up as an MTP Device like the Dell Ditty):

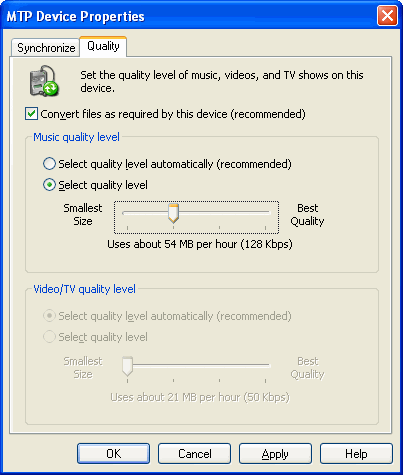
Select your audio device, and then click on Properties. Click over to the Quality tab and click on the Select Quality Level radio button. It should look like this:

The quality slider is what you need to set – Windows Media Player will transcode the files to WMA format, at anywhere from 64kbps to 192kbps. Just like before, the quality you select depends on how and where you’ll be listening to it. Working out at a loud gym? 64kbps will probably be fine. Listening at a quiet library with high quality headphones? 128 kbps WMA would be appropriate. Again, there’s no “right” answer here – it’s whatever sounds best to your ears.
There’s one down-side to this procedure: because every file has to be converted, synchronizing your music will take longer. How much longer depends entirely on the CPU speed of your computer - audio transcoding is a CPU-intensive task. So if you’re the kind of person that thinks of putting music on your player 5 minutes before you have to rush out the door, this might not be the best solution for you. ![]()
Entry Filed under: Tutorials

