How I Travel & Charge my Devices Worry-Free

The image above is was created by Google’s Gemini AI tool on my Pixel 9 Pro. It’s mostly accurate except what is that thing in the lower right? 🤔

I’m not an exceptionally well-travelled person (I have a friend who has flown 60 times so far this year; I’m at 10% of that), but I’ve travelled more than some. I consider myself an intentional traveler; someone who thinks about and plans for the act of traveling. Each time I travel, I find it strangely enjoyable to look at what I use — everything from tech to cables to clothing — and figure out if there’s a way to pack less or pack smarter by bringing something different. Travel can be very stressful, so I try to not be like the guy in the image above. I control what I can control (my choices of what to pack, when to leave for the airport, etc.) and try to flow with the rest that I can’t control.

For a techie like me, keeping my electronics — MacBook Pro, iPad Pro 11, Pixel 9 Pro, Pixel Buds Pro 2, Kindle PaperWhite, and FitBit Charge 5 — powered up is critical. I was chatting with a friend about what each of us carries and the resulting messages to him were a good portion of this blog post. I figured why not share with the world?

One important point in understanding why I carry what I do is that I have a deep-seated need to never NOT have the right adapter/plug/solution to solve my own problem or help someone else. I was never a Boy Scout, but I do have an “always be prepared” mentality when it comes to technology and traveling.

It’s amusing to me that four of the six devices I travel with have “Pro” in the name — apparently, I need to seek out a “pro” e-book reader and watch!

Up until recently, my one and only charging solution was what today I have dubbed the Max Charging Pack (it needed a name for this blog post). A couple of trips ago I was on a flight, and it was packed in my carry-on suitcase. I wanted to charge my phone (I’d used it much more than normal) and I was irritated that I didn’t have my charging gear in my backpack — but I’d purposefully put the Max Charging Pack into my suitcase because it made my backpack much heavier. When I returned home, I decided to create a minimalist charging pack, something I could always have in my backpack. What’s the difference between the two? Let’s dive in…

Max Charging Pack | 44 oz (2.75 lbs.) / 1247g
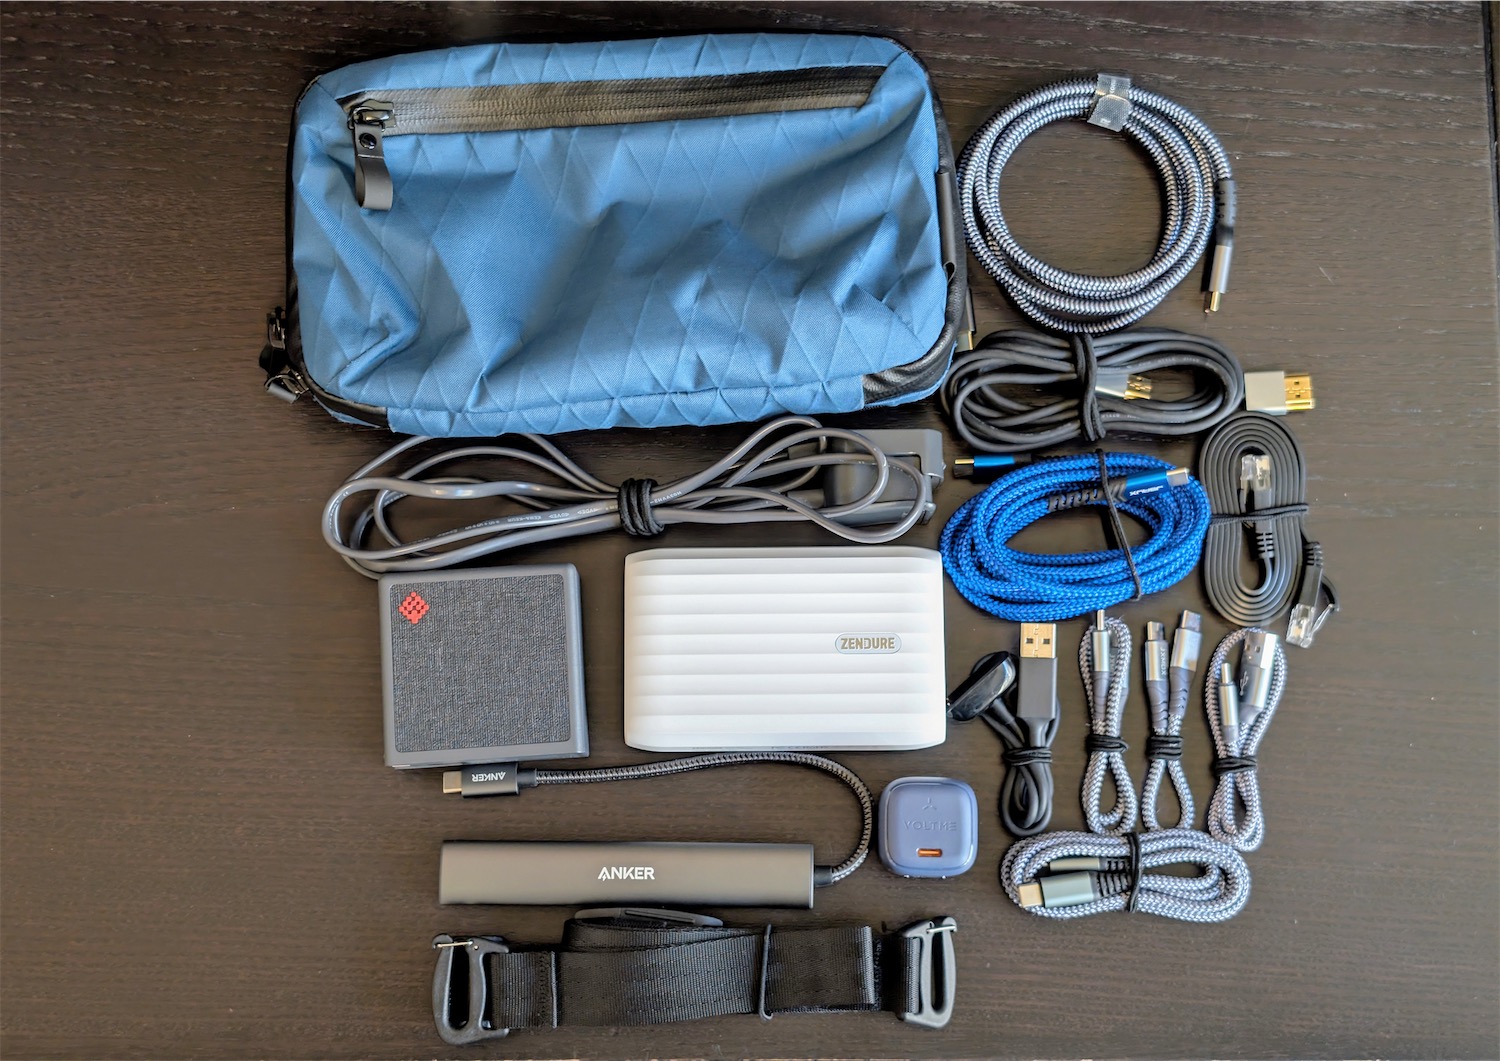
The Max Charging Pack has a lot, and weighs a lot.
  • Alpaka Elements Tech Case Mini in Ocean Blue | X-Pac RX30 (I carry the shoulder strap with me so I can use it as a mini sling)
  • SlimQ 100W USB charger with interchangeable travel heads (3 x USB-C, 1 x USB-A)
  • Zendure X5 15,000mAh battery (45W output)
  • VOLTME 30W travel charger (one USB-C port, and the best size to watts ratio I’ve seen so far for the price; I love this product!)
  • Anker 6 in 1 USB-C hub
  • Travel Ethernet cable + travel HDMI cable
  • A Fitbit Charge 5 cable (proprietary cables can 🔥 burn in hell 🔥, but I do get it for a watch)
  • A variety of USB-C cables, including a three-foot Thunderbolt 4 cable, a long six-foot cable, and a variety of shorter 6-12 inch cables (and one USB-C to USB-A cable)

The SlimQ charger is really the star of the show here because it can be connected to a wall socket directly, or with an included cable that allows me to keep the charger up on the hotel desk/table and use short cables. It also has international heads that can be swapped out, though I have yet to use it internationally (which will change in November).

Mini Charging Pack | 14 oz (0.87 lbs.) / 396g
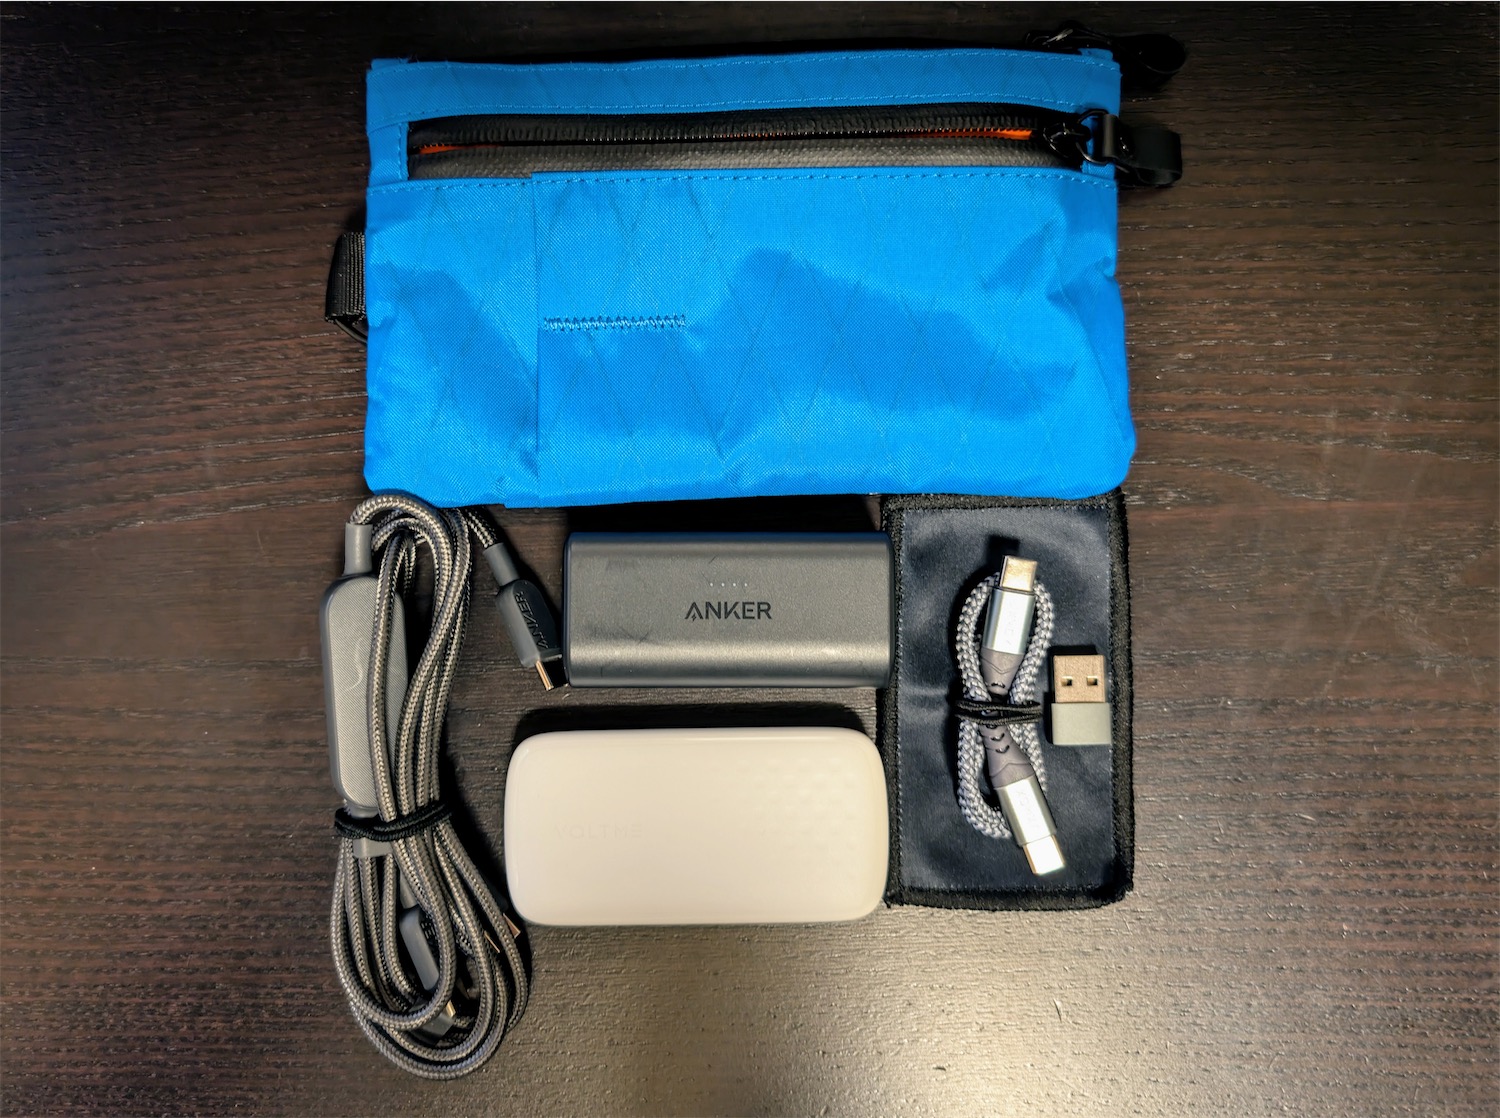
I carry the mini charging pack in my backpack so it’s within easy reach for charging on the plane via seat power or using the battery if that’s my only choice.

Everything fits nicely, as I place the Anker battery vertical, the Anker cable and VOLTME charger horizontally, and I have some room to spare. It was important to me that this pouch not get too thick and bulky. This configuration keeps the Zip Clutch fairly thin and it slips into the pouches in the backpacks I use (mainly the Alpaka Elements Travel Backpack, or the Alpaka Metro Backpack for office trips).

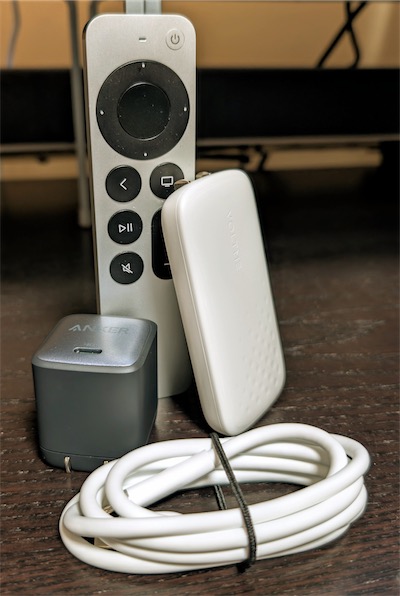
Image: on the left, my old Anker 45W adaptor replaced now by the 65W VOLTME Slimline on the right.

Additionally, because the Alpaka Zip Clutch has a decent-sized front pouch, it works well to carry all my small to medium-sized adaptors. So that’s a CF Express Type B card reader (for my Nikon Z6 III), an SD/microSD card reader, a SIM card ejector (though in this era of eSIMS, increasingly not needed), microSD to SD adaptor, a small USB-C adaptor I put on the end of a USB-C cable to see wattage levels, and a variety of any-port-to-USB-C adaptors. Many of these I carry just in case someone around me needs to connect an older device.
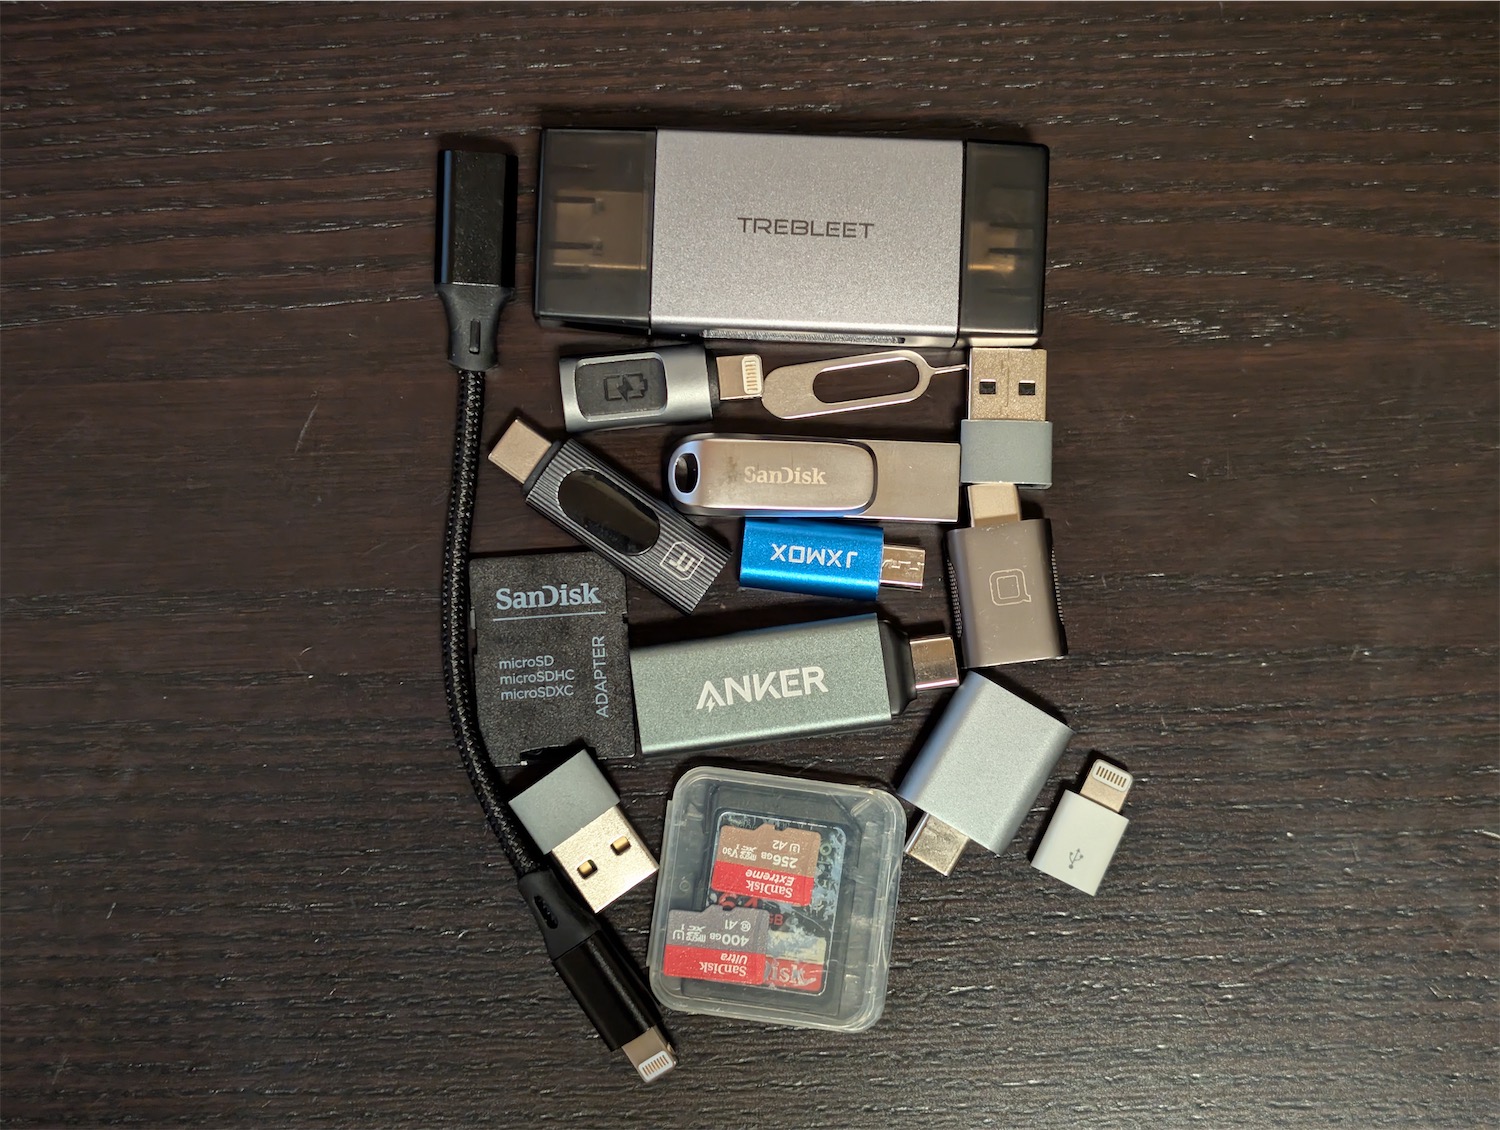
I could probably get rid of some of these and not notice until that ONE time I needed them…

I also carry a variety of flash storage: a 512 GB flash drive, 400GB and 256GB microSD, and a 64 GB SD. The former for file movement, the latter for extra device storage (my drone). I can’t remember the last time I had to use these storage devices, but better to have them than not (seeing a theme here? 😂).

What goes where?

I tend to keep the big charging pack in my carry-on suitcase, and the mini pack in my backpack. I’ve discovered I am much happier pulling weight than having it on my back. 😄 So the max goes into the suitcase, usually a carry-on, but sometimes checked if it’s a family trip and we carry a big, checked bag.

It’s easy to see which one is the mini and which one is the max. 😆

Resisting overkill wattage obsession

As GaN chargers have proliferated over the past few years, chargers have gotten smaller and smaller, which is amazing for travel. They’ve even managed to increase the wattage without making them huge. This has led to a “wattage war” where every year the major players try to out-do each other with more watts. Currently that seems to be 140 watts, which frankly is overkill unless you are charging two laptops simultaneously and you need to charge them quickly.

Most people don’t really understand how devices top out in their ability to accept incoming power. I’m fond of cables and adaptors that tell me how much power a device is using to charge, and it’s less than you’d guess. My MacBook Pro 14 tops out at 96 watts, and that’s only when it’s extremely low on power. Usually, it charges at about 50 watts or less. If it’s got a nearly full battery, I can work on it all day while connected to a 30-watt charger and it will remain at full charge. My iPad Pro 11? 34 watts, then ramps down to 10 watts or less as it gets close to full. My Pixel 9 Pro? 27 watts max, then down to under 5 watts.

I’ve considered carrying a few of the $10 VOLTEME 30-watt cube chargers to give to people who I see at airports charging their iPhones or iPads from the old 5-watt charger, which, when you’re looking for a quick charge, is almost useless unless you’ve got an hour to spare. I’ve yet to do this because random generosity could be taken the wrong way, and they might not have a USB-C iPhone/iPad. But I still think about it as I watch people charge oh-so-slowly. 🫠

I’ve been trying to be thoughtful about how much wattage I really need and that has changed how I think about charging. On two recent trips, I brought the Max Charging Pack with me, yet left it in my suitcase, using only the Mini Charging Pack and guess what? It did everything I need, even with the previous version of my pack topping out at 30 watts with the VOLTME. I have yet to travel with the 65-watt VOLTME, but it will do all I need for solo travel.

Time to pack!

I don’t know if I’ll ever truly be “done” optimizing my tech charging gear, but this recent iteration feels like it’s about as good as it’s going to get barring new breakthroughs in GaN charging. I’ll never say no to smaller, but I will say no to anything that offers more power than I will realistically use. I have my first international trip with this new charging gear coming up in November, so I’ll see if my choices allow me to continue being a relaxed traveler. Stay tuned. 😉


How to Combine Multiple Alaska Airlines Discount Codes Into One

If you fly with Alaska Airlines long enough, and you’re like me and contact customer service when things don’t go quite right, you’ll probably end up with a handful of small credits codes on your account. Alaska typically gives out $75 discounts for future travel as a customer service gesture, which I really appreciate. ?

These credits can stack up over time and if you get enough of them they can be worth quite a bit – especially if you travel as a family and things go sideways. During the Christmas 2016 season my family and I were stuck at an airport as Alaska bumped our flight over and over again – we ended up spending an extra five hours at the airport (three cheers for iPads with fully-charged batteries!). Alaska proactively gave each member of my family a $75 credit, and through other credits I ended up with a total of $475 worth of discounts. Great right? Not so fast.

lots-of-alaska-discounts

The problem, and this won’t surprise anyone, is that Alaska’s booking system works in direct opposition to the concept of the customer service credits. You can only use one discount at a time, and discounts can’t be combined with each other or with offers such as a companion fare. On the one hand, Alaska apologizes for poor experiences with credits – but they make it extremely difficult to use them unless you travel frequently. Credits last a year, which is OK, but most people don’t travel 7+ times a year so I suspect most people lose their credits (which Alaska knows). Continue reading How to Combine Multiple Alaska Airlines Discount Codes Into One

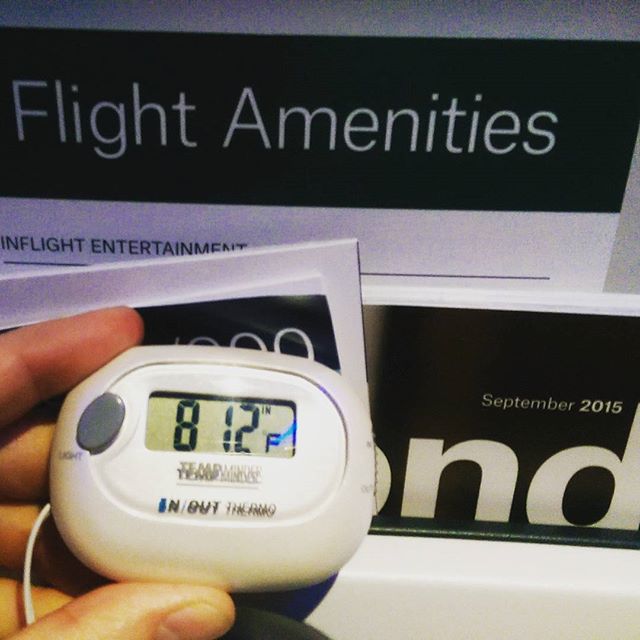
How hot does @alaskaair keep their plane on a #Dallas to #Seattle flight while in the air? This hot: 81.2F (27.3C). I didn’t sign up for a sweat lodge vision quest!

How hot does @alaskaair keep their plane on a #Dallas to #Seattle flight while in the air? This hot: 81.2F (27.3C). I didn't sign up for a sweat lodge vision quest!

A visual aid to my previous post on the the very hot Alaska Airlines flight I was on earlier this month. I wanted to show Alaska Airlines the photo proof. 🙂

The Joys of Airplane Business Travel

Ever had one of those airport + flight experiences where enough things go wrong that you wish you could do it over again?

I get to the Dallas airport yesterday, having put in my Nexus pass number online and excited that I can finally use the shorter security line (bit of a long story as to why I’m only figuring this out now), only to find out it has to be put in 24 hours before the flight departs for it to show up on my ticket as a TSA Pre-Check. Apparently the fact that I did it 26 hours before my flight wasn’t quite enough time. Go figure.

Then I go through security and the four people in front of me go through the metal detector. I get instructed to go through the body scanner. I opt out of the body scanner as I normally do. I don’t mind the pat down; I do mind the unnecessary radiation (if there’s no medical reason for it, and it’s not helping me diagnose a medical problem, I don’t want it, no matter how safe it’s supposed to be). The body scanners are part of the war machine that churns away in the USA (and Canada) and is more about fear than actual security. So long as there’s an option to opt-out, I’m going to take it. Getting scanned because I’m told to is not something I’m OK with. The security agent loudly informs everyone in the area that the scanner is harmless and there’s no reason to avoid it. OK, thanks for that Mr. TSA agent, I appreciate you trying to embarrass me. Continue reading The Joys of Airplane Business Travel

All Expedia Sites Are Not Created Equal: Do Your Travel Research

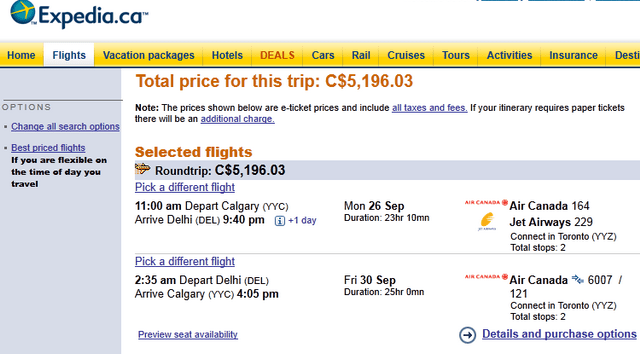
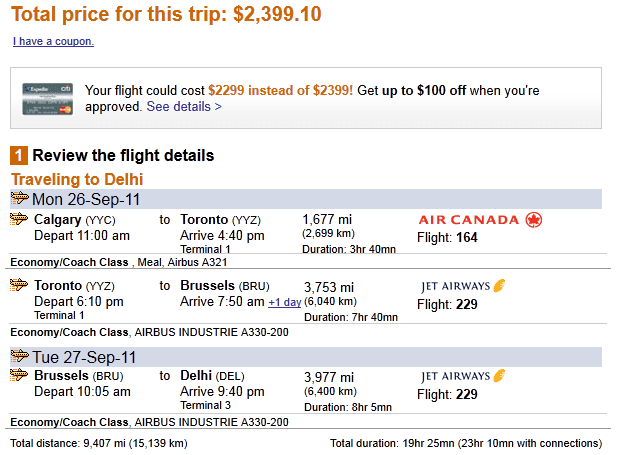
This is an oldie, but a goodie: I’ve had these screen shots kicking around my hard drive for a few years (one of the many draft posts that were stuck in my own head). I was booking a trip to India when I first started at HTC, and my first stop was Expedia.ca. The price tag? A staggering $5196 Canadian (and this for coach class):

expedia-canada

Below is the same trip as booked from Expedia.com, and it’s 52% LESS EXPENSIVE for the same flights on the same dates! There’s a slight exchange rate to factor in there, but not much of one. If ever there was proof how expensive it is to book things from Canada, here’s the sticker shock to prove it!

expedia-usa

Hurricane Earl – Halifax, Nova Scotia – 2010

This is the awesome weather I’m seeing on the first day of our vacation to Eastern Canada. This was shot from the entrace to the Cambridge Suites hotel in Halifax, Nova Scotia, Canada, on September 4th, 2010.

Japan 2008 Photo Book Completed: View it All Online

Yes, it took me about two years to get this project finished, but I’ve been pretty busy over the past nine months figuring out the whole dad thing! 🙂 I’m man enough to say publicly that I’ve always had a fondness for collecting memories in scrapbook form; not the frilly scrapbooks that come to mind when you hear the word, but collecting photos and objects from a time or place and putting them in book form. I have a dozen or so cheap and ugly scrapbooks from my teenage years that contain a lot of great (and not so great) memories.

I’ve been wanting to use FotoFusion to create a truly killer vacation book for years, but didn’t manage to get around to it until now. Creating Logan’s baby book was my first attempt at using FotoFusion to create a book that combined photos, text, and my green screen scanning technique for objects. FotoFusion isn’t the easiest program in the world to use, so creating Logan’s book was great practice – I managed to fly through the creation of the Japan photo book in about a week using the skills I picked up creating the baby book. That was after, of course, the months it took to edit all the photos I took, and scan all the objects I collected on the trip.

Below are a few of the pages I created for the book; the final result is 85 pages long, and by next week I should have the book back from Photobook Canada. As you can tell, I created square pages; I opted for the 11 inch by 11 inch book from Photobook Canada. Even after using a coupon code for a discount, after the $15 premium paper upgrade and $15 shipping charge, the book cost me around $120. Ouch! Yeah, kind of a pricey book; the good news is that I only need one copy, unlike Logan’s baby book where I needed several.

Comments welcome – you can check out the full gallery here (it’s easiest to view it in slideshow mode, or full-screen browser mode).

Microsoft MVP Summit 2010 – Bellevue/Redmond/Seattle

A couple of weeks ago I went to the Seattle area for the Microsoft MVP Summit 2010 – below are a few pictures.

Public Service Announcement: Stand The Hell Back From The Airport Baggage Carousel, Thanks

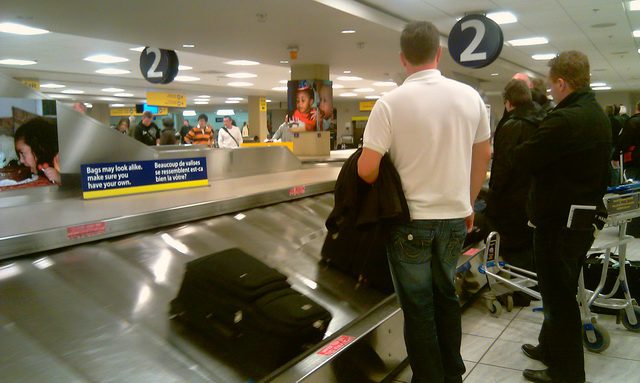
If you fly more than once a decade, you’ll doubtless have seen the above scenario (photographed at the Calgary airport on my way back from my CES 2010 disaster trip). People line up to get their baggage at the carousel, but rather than everyone standing back a couple of feet so more people can see their bag coming, 99.9% of people cram right up to the rail, often leaning in to see what’s coming – completely blocking the view for everyone else. What ends up happening of course is that you see your bag as it passes right in front of you, and you loudly exclaim “Excuse me!” as you lunge for your bag before it goes by. When I was at the Las Vegas airport, an elderly gentlemen and I were standing a few feet back while everyone else crammed and scurried in front of us. He exclaimed “When I was in kindergarten I learned to take my turn – what’s wrong with these people?”. Preach it old man!

People, it’s just common sense: stand back a bit and only step forward to grab your bag when you see it coming. Thank you – this ends the public service announcement.

Oh, So They Really Do Shut Down The Gate An Hour Before The Flight Leaves?

I feel like such an idiot. Today I was leaving for my flight to Seattle – to attend the Microsoft Mobius 2009 event – and my flight was leaving at 1:30pm. Not boarding, but leaving the ground. I have a NEXUS pass, which allows me to breeze through US customs quickly, so an hour is more than enough time for me to get my boarding pass, go through US customs, then go through security and walk to the departure gate. In fact, I can typically do that in 15 to 20 minutes at the Calgary airport – giving me 20+ minutes sitting at the gate waiting for the plane to board. I’ve always thought I have more important things to do than sit around at an airport, so I tend to cut it close.

Well, today I cut it a little too close…I arrived at the Calgary airport at 12:32 PM, and was at the Horizon/Alaska gate by 12:36 PM with my US customs card completed. There was no one there, so I went over to the next gate to ask how I could find someone to check me in for the flight. I was directed  to the Horizon/Alaska office 50 feet away. I walked in, asked for someone to check me in for the flight, and was told that was impossible – the gate was closed. My jaw fell open and worked silently for a moment, then I sputtered “But…but…I must missed it by only a few minutes! There’s really no one that can check me in? They informed me that Horizon/Alaska closes the gate exactly 60 minutes before the flight leaves, and that once the gate is closed, there’s no way to check baggage – so if I wanted to make this flight, I’d have to go with carry-on only. There was another flight leaving at 6pm today, and if I wanted I could exchange my ticket for that flight at no charge.  Those were my only two choices. Continue reading Oh, So They Really Do Shut Down The Gate An Hour Before The Flight Leaves?