
A quote About Marriage


A great quote applicable to every part of our daily life:
“We are prisoners of our own experience…it’s very, very difficult to dispel ignorance if you retain arrogance.”
– Sam Wilson, US Army (retired)
From “The Vietnam War” documentary series by Ken Burns & Lynn Novick.
This has been republished from LinkedIn
Right under the wire (OK, OK, it’s over the wire), here’s my second installment of the #IronSharpensIron series I started two weeks ago. I had intended to write about a masterful gamification program run by a company we all know, but that article will take more effort to pull together that I had time for this week, and a different topic fell into my lap today.
Everyone who sends email knows that depending on the campaign, even a 5% open rate can be seen as an excellent result. So if a customer not only opens your email, but acts on it, you’ve got a great opportunity to to accomplish something with that customer.
Today I received an email from Evernote support after I’d submitted a support request earlier in the week. Evernote is a tool I’ve used for over a decade, and while I generally like it, there’s a fatal product flaw I discovered when I bought my iMac back in 2015: the audio recording quality is horrendously bad (8,000hz mono WAV files if you’re an audio geek). It has nothing to do with the microphone on the device, and everything to do with the poor quality that an Evernote product manager years ago decided was the right setting to use. Compare that with the much better quality of their iOS app recordings – 44,100hz M4A files – and you have a very uneven customer experience where using their app on a desktop is a more compromised experience than mobile. The Evernote community forums have had dozens and dozens of customers complaining about the same issue over the years. Evernote has never committed to fixing this issue; this sets the stage for my Evernote support ticket.
I emailed and expressed my frustration at having audio recordings of such low quality it was difficult to understand what I was saying in them. Their support tech was helpful – at first he said the poor quality was due to the microphone after he did some tests, but after I provided him the sample files above and explained the technical differences between the way each of their apps records audio, he confirmed my findings and filed an internal feature change request to fix this issue. I couldn’t have asked for anything more than an Evernote employee taking my request seriously and acting on it. I know that doesn’t mean the fix will make it into a future release – I’ve gone through the painful process of stack ranking things I want in my product, knowing I can only get some of them – but it’s better than nothing.
Evernote’s support email system sent me an email today asking for my feedback about the product, and my experience with the technician. I act on these types of emails about 50% of the time, but I was so pleased with that the efforts and helpfulness of the support tech I dealt with, I was eager to reply. Here’s the email they sent me:
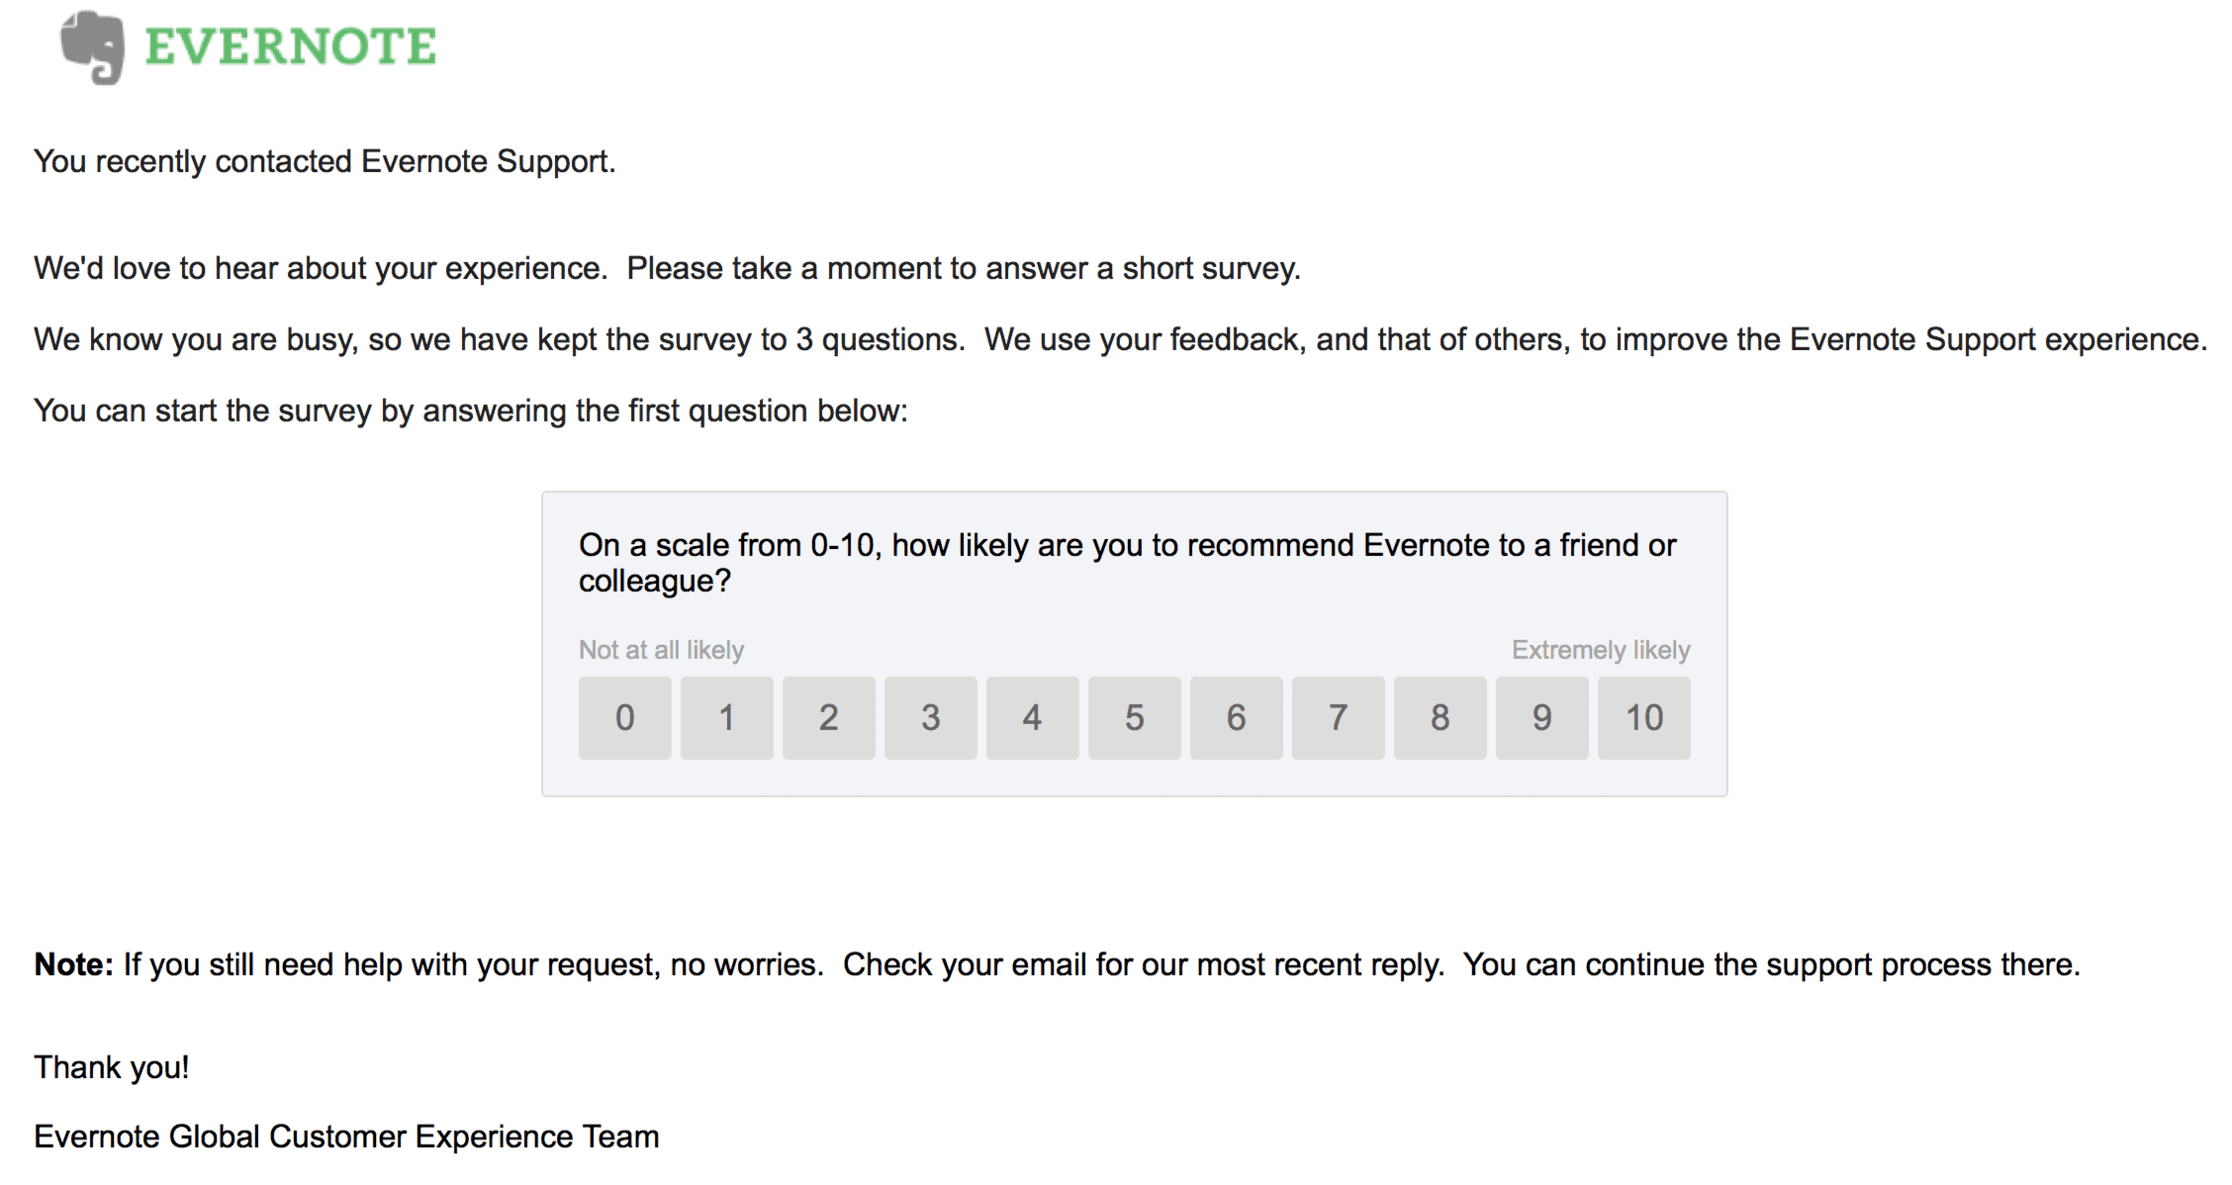
There’s a clear one-click CTA: give us your feelings about Evernote as a product. Given my frustration with Evernote not fixing this issue for years, I clicked on the number five and it took me to a page that asked three questions: the product rating question again, a rating for the support technician (I gave him a 10), and an open comment field for why I gave the tech that rating. But no field to explain why I gave their product a five out of ten.
If you have a customer who’s willing to explain why they gave you a negative product rating, why wouldn’t you take advantage of that? Why not have a branching survey with a few more questions to understand the nature of the frustration? Heck, take a small percentage of those and offer to let the customer talk directly to a member of the product management team. Far too many product teams hide behind their anonymity and don’t get down into the trenches with the people actually using their products.
Feedback is a gift, and not receiving the full measure of that feedback squanders it.
Settling for a single NPS-style score tells you nothing other than you have an unhappy customer. There’s no greater gift a company can get from their customers than an understanding of what they can improve to make that customer happy with it again.
Have you seen examples lately of companies not taking advantage of feedback from their customers? How does your company treat customer feedback? Let me know in the comments below.
We went to Legoland in June and among the more impressive Lego creations we saw were the incredible Star Wars creations. The amount of work that went into these must have been intense. Amazing to see! Here are all of my photos from this part of Legoland.
“As iron sharpens iron, so one person sharpens another.” – Proverbs 27:17
This is being re-published from LinkedIn.
Welcome to the first in what I hope will be a long-running series of articles about effective, and ineffective, real-world strategies and tactics for digital marketing, customer/user experience, gamification, community/advocacy, commerce, and more. I firmly believe some of the best learning experiences come from observing live marketing efforts and learning from your peers. I’m tired of the generic “Top 10 Strategies for Success” type articles that litter the landscape. That’s not to say that you can’t gain insights or ideas from such articles, but the more generic an article is, the harder it is to see how well it might work for you because there’s no benchmark to measure from. Nothing beats the real thing as the saying goes.
Learning from each other – iron sharpening iron – means looking at real-world executions of digital marketing and not being afraid to call out failures along with successes. Being specific in this way has some risk; one digital marketer calling out the efforts of another, even in a generic, way might not always be…appreciated. It’s the biggest reason I was afraid to start this series of articles; I work in this industry and didn’t want to come across as someone who’s armchair quarterbacking the efforts of others. But…
As Seth Godin likes to say, sometimes you just have to leap off the edge.
My hope though is that by being constructive in my criticism we can all learn something – and if someone involved in that marketing wants to publicly respond to my critique, all the better! I’m an outsider looking in and of course only know part of the story. I’m hopeful others will jump in and offer their perspectives as well. The beauty of digital marketing is that we can all move fast; try something, measure the results, adjust, try again, and measure the outcome. There are very few scenarios where there’s not an opportunity to learn from failure, adjust, and give it another shot. The Internet never closes.
Failure comes in a few forms, but there’s no bigger hurdle to overcome than the expectations of your customers. In that vein, I am obsessed with the idea of digital friction. It’s a concept first introduced to me by Jason Goldberg during a (sadly under-promoted) hour-long webinar we did with him when I led the now-defunct Business Circle. Once you start to look at all online interactions through the lens of digital friction, you simply can’t look at things in any other way. It’s a customer-centric perspective that has your desired outcome at the end, and evaluates everything – no matter how seemingly minor – along the way that would interfere with the customer arriving at the outcome you want. It doesn’t matter if it’s a newsletter sign-up, a donation, or buying a pair of shoes.
Every process has friction and eliminating that friction smooths the path to success in our efforts.
As marketers we tell ourselves all manner of myths about why someone didn’t do the thing we wanted them to do; many companies under-invest in real-world user research and resist asking customers themselves about their experiences. Or, if they do, it’s with an irritating pop-up survey window that most of us click close on by instinct because we haven’t actually done anything yet (I’m looking at you Foresee). Customer engagement is often viewed as a support-centric experience ad a cost center. “If we’re hearing from our customers it’s costing us money” is how this thinking tends to go. That’s a tremendously short-sighted way of looking at customer engagement and and is something I plan to focus on.
My goal will be to consistently publish one of these #IronSharpensIron articles bi-weekly, and I hope you’ll comment, share, and give me feedback as this series grows – because I’m always open to some sharpening from a peer!
My transition to being mostly Apple hardware has taken a few years, starting with an iPod Touch years ago. I still use an Android phone, but my desktop is an iMac, my laptop is a Macbook Pro, and I have three iPads in my home. My wife has inherited my trusty Dell XPS 13 though, so I still have access to a great Windows laptop. ?
I’ve decided that at this moment in my life, the benefits of what Apple offers is worth what I have to pay for it…but that doesn’t mean I can’t get a little grumpy as I watch how Apple updates – or, more accurately rarely updates their Mac product line. The iPad is, in my opinion, the best tablet you can buy today. The iPhone is an excellent product. But Apple’s Mac products? They alternate between stale to compromised, outdated to ridiculously expensive. And yet because they are the only way to get macOS, people who want to use that platform have no choice.
Above is what Apple’s site navigation looks like today. They add the word “New” in orange when there’s a product update. What would it look like though if they were a little more honest? This. ?

(you’ll want to click on the image to appreciate all the sarcasm)
I’d created the graphic below months ago, so wouldn’t you know it today was the day that Apple finally put 8th gen Intel CPUs in their Touch Bar-based Macbooks and updated a few other key things (more max RAM and SSD options). The new Macbooks might have better battery life, and they might have fewer keyboard problems. We’ll see!
If you’re a Mac user, what do you wish Apple would update next?
I have a long history with AudioEngine speakers; I first reviewed their A5 speakers back in 2007, and their A2 speakers in 2008. I’ve owned their A5+ speakers since 2011, having only recently retired them from use last year, and not by choice; we put a bigger TV in a spot where a soundbar was needed in front of the TV because we needed all the width of the mantle for the TV. The point is, I have a deep fondness for AudioEngine products so I had high expectations as I excitedly unpacked the box with the A2+ powered speakers. I have a tremendous ❤ for products that are red, so one of the reasons why I asked to review the A2+ speakers was because they game in this glorious red colour:
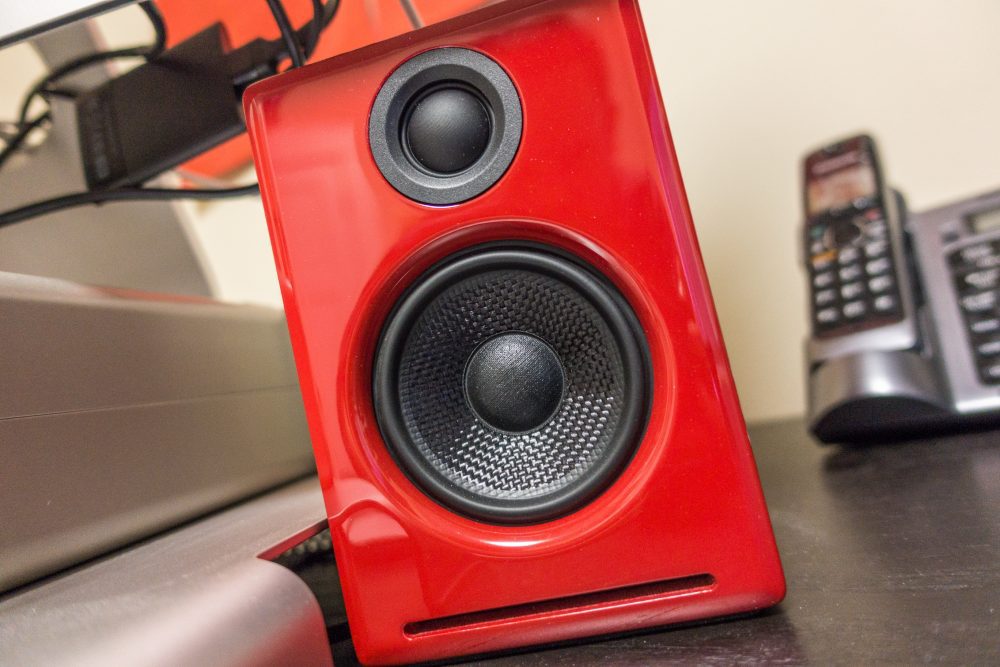
The speakers are available in satin black, high-gloss white, and the above high-gloss red. The photo above is slightly deceiving: it looks brighter in my photos than in the normal lighting of my office. Because it’s so glossy, the colour pops depending on how much direct lighting they are in. Tucked beside and behind my iMac, they are a deep, dark, blood red.
In virtually every review of speakers or headphones, the writer will trot out obscure artists and tracks, trying to impress the reader with their musical pedigree. I shall do no such thing, and simply say that with the variety of music I listen to regularly from these speakers – pop, rock, a capella, country, orchestral scores – I am extremely impressed with how great the A2+ speakers sound. You’re not getting booming bass here without hooking up a sub-woofer – that’s a matter of physics, and these are small speakers – but when cranked up, these tiny powerhouses will move some serious air (you’ll actually feel wind blowing strongly on you at higher volumes) and they sound quite full for their size.
Volume wise, listening at four pips of volume on my iMac has the speakers at about 62dB (measured with a sound meter at 16 inches away). It’s what I consider a “comfortably loud” volume level – not quiet background, volume you can actually hear and appreciate the music. At 50% volume (8 pips) they’ll hit 84db. At 100% volume (16 pips) they’ll hit 105db – a volume level I find painful being so close and would never use, but if you’re trying to full a medium-sized room at a party, you may need this volume. At max volume they hold up without distortion on every song I tested them with, and while I won’t “song drop” I tested a live cover of “Superstition” with some heavy bass and at 100% volume it was smooth and (OK, OK, check the bass solo at 4:08 here).
Continue reading AudioEngine A2+ Speakers in High-Gloss Red Reviewed
Last week I went to an exhibit in Las Vegas called the Marvel Avenger’s S.T.A.T.I.O.N. If you’re a Marvel movie geek like I am, it was a lot of fun (and I’ll post photos in a bit). While there though I took a photo of Iron Man’s War Machine armour used in the movies – the real prop – and it turned out so well I knocked out the remainder of the background and turned it into 5K (5120 x 2880 pixel) desktop wallpaper. I optimized it for macOS but it should work pretty well on any device (I have it as my lock screen wallpaper on my iPad). The photo was taken with my Sony RX-100 Mark IV, and I did a bit of Photoshop work to make the background fully black. The original doesn’t look much different than this though – the blue lighting was how the armour was shown. Enjoy!
 [Click to download the left-aligned 5K War Machine armour]
 [Click to download the right-aligned 5K War Machine armour]
 [Click to download the centre-aligned 5K War Machine armour]
Here’s the story of what I was doing in Dallas last fall, and how I was able to see Aerosmith live. A couple of photos and a link to the full gallery and video are below. But did you I know I got ejected from the show floor? ?
If you fly with Alaska Airlines long enough, and you’re like me and contact customer service when things don’t go quite right, you’ll probably end up with a handful of small credits codes on your account. Alaska typically gives out $75 discounts for future travel as a customer service gesture, which I really appreciate. ?
These credits can stack up over time and if you get enough of them they can be worth quite a bit – especially if you travel as a family and things go sideways. During the Christmas 2016 season my family and I were stuck at an airport as Alaska bumped our flight over and over again – we ended up spending an extra five hours at the airport (three cheers for iPads with fully-charged batteries!). Alaska proactively gave each member of my family a $75 credit, and through other credits I ended up with a total of $475 worth of discounts. Great right? Not so fast.

The problem, and this won’t surprise anyone, is that Alaska’s booking system works in direct opposition to the concept of the customer service credits. You can only use one discount at a time, and discounts can’t be combined with each other or with offers such as a companion fare. On the one hand, Alaska apologizes for poor experiences with credits – but they make it extremely difficult to use them unless you travel frequently. Credits last a year, which is OK, but most people don’t travel 7+ times a year so I suspect most people lose their credits (which Alaska knows). Continue reading How to Combine Multiple Alaska Airlines Discount Codes Into One